My Computer Gets Downgraded Once Again Donut
Windows 11 is the next-gen Os experience that Microsoft promises. But for all the new bells and whistles that come with the new operating system, there's a functioning price. If you're working with a depression to medium-end PC, chances are y'all will feel some languor when using Windows 11 with the default settings.
When looking at all the things that might make your WIndows 11 OS perform slower than usual, there are really a lot of different potential culprits.
All of them have a small affect on your organisation'southward performance, but when you add them all up on a organisation with express resource you'll cease upward experiencing general arrangement sluggishness as your PC struggles to find the calculating ability required to keep things running smoothly.
Hither's a list of optional Windows 11 features and components that are known to crusade your Windows xi computer to carry slower than usual:
- Unnecessary Ad-related services – Personalized ads and local content is a cool feature on Windows 11, simply one that hogs lots of system resource in the background. If you don't care for ultra-targeted ads, you tin can disable ad-related permissions to stop their associated services from running in the background.
- Windows eleven is ready to Best Visuals – Windows 11 gives you the pick to switch from performance optimization to the all-time possible Windows 11 visuals and vice-versa. If you lot have a low-end CPU and GPU, y'all might speed up Windows 11 considerably by adjusting the Performance Options to Best Functioning.
- Unnecessary startup services – If you don't proceed the startup services that are immune to run in check, you will somewhen get to a bespeak where Windows 11 will deadening down, especially immediately after a fresh startup, as your OS has to load a lot of 3rd party services. You lot can fix this problem past using Task Managing director to track downwards the services with the biggest resource consumption and prevent them from starting along with every startup.
- Fragmented OS bulldoze – Windows eleven is smart enough to automatically defragment and optimize the drive where the operating arrangement is installed. But if you lot're coming over from an older Windows version where this characteristic was disabled, yous tin can prepare the problem past forcing a disc optimization on your Windows 11 drive.
- Corrupted System FIle Cache/due south – Rendeding dependencies like the ones left behind by DirectX or Temporary Internet Files tin likewise lead to a system deadening down on WIndows 11. Fortunately, you can have care of them swiftly by using the Disk Cleanup utility.
- Temporary Files – If your Temp and Prefetch folders are filling up, expect to meet your Os perform increasingly slower. Windows 11 is configured past default to regularly clean & maintain these directories by default. Nonetheless, y'all can take matters into your own manus by deleting the contents of the Temp and Prefetch folders.
- Mouse sluggishness issues – Windows 11 users coming over from an older Windows installation might endure from a weird bug where the mouse seems to lag behind the actual movement due to a Registry parameter that was incorrectly migrated. In this case, y'all can set the outcome by using Registry Editor to modify the MouseHoverTime string.
- System File corruption – System file corruption tin also be responsible for this issue, particularly if you lot only started to feel irksome down periods after an unexpected shutdown or after your antivirus quarantined some potentially infected files. In most cases, you tin can get this effect resolved by running SFC and DISM scans from an elevated Windows Terminal window.
- Failing drive – In case a lot of this Windows 11 slowdown is centered effectually you lot waiting for File Explorer to brandish files and folders every bit you're browsing for stuff, a failing bulldoze is too on the tabular array. In example only a few sectors are afflicted, you can use the Check Deejay utility to supercede falling sectors with unused ones.
Now that y'all are familiarized with every element that might brand your Windows eleven computer perform slower, allow's go over the diverse things that you can do to optimize the performance of your operating organization.
Disable Unnecessary Privacy permissions
With Windows xi, Microsoft has made a large push with personalized ads and widgets that volition brandish locally relevant advertising content. While this is all great since you lot'll be receiving ads that will really interest y'all, it's not great at all for your overall arrangement performance.
Early on Windows 11 adopters are beginning to realize that all these actress services used by Windows 11 to display personalized ads and content end upwardly hogging a lot of precious system resource – while this is not an issue on a high-end PC, expect to experience full general languor when utilizing Windows 11 on a arrangement with limited resources.
Fortunately, yous tin alleviate this problem past accessing the Privacy and Security tab in your Windows 11 settings and disable every unnecessary privacy permission.
Note: This will ensure that the services behind these permissions will no longer run and pig your system resource.
Follow the instructions beneath for a step-past-step guide on disabling every unnecessary advertisement permission service on Windows xi in club to improve the performance of your arrangement:
- Press Windows key + I to open up up the Settings bill of fare on Windows xi.
- From the Settings menu of Windows 11, click on Privacy & Security from the context carte du jour on the left-hand department of the screen.
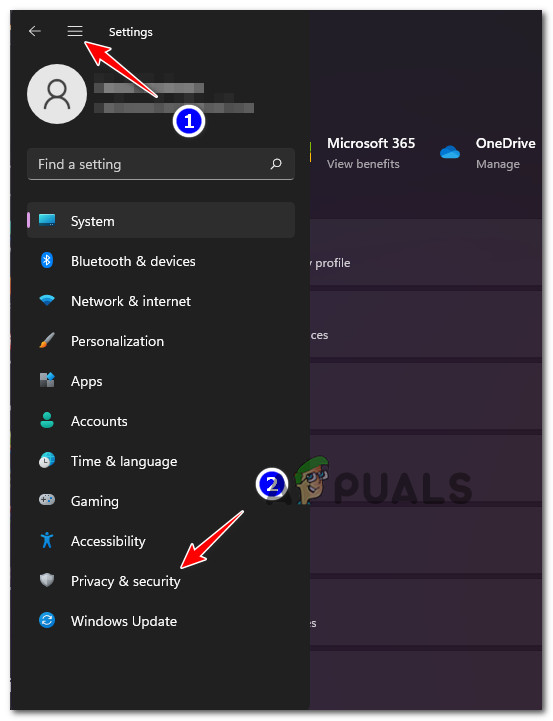
Accessing the Privacy and Security tab Note: If the vertical menu on the is not visible by default, click on the action icon (meridian-left corner of the screen) to make information technology visible.
- Inside the Privacy & Security tab, move over to the bill of fare on the right and click on General.

Accessing the General tab on Windows 11 - Next, disable the post-obit options from the General tab of Privacy & security:
- Permit apps bear witness me personalized ads past using my advertizing id
- Let websites show me locally relevant content by accessing my language list
- Let Windows improve Showtime and search results past tracking app launches
- Show me suggested content in the Settings app

Disable Personalized ads and local content on Windows 11
- Adjacent, hit the back icon and click on Voice communication from the list of available options.
- Inside the Speech communication carte du jour, become ahead and disable the toggle associated with Online spoken language recognition.

Disable Voice communication Recognition on Windows 11 - Striking the back icon once again to return to the Privacy & security carte and coil all the way down to App Permissions.

Accessing the App permissions on Windows eleven - Inside the App permissions menu, go ahead and disable every permission that you're not actually using or care nigh:
- Location – disable it if you're not using SmartLock or a like location-based feature.
- Camera – disable it if yous don't have a congenital-in camera.
- Voice Activation – disable it if you lot don't utilize voice commands.
- Contacts – disable it if you don't maintain a listing of contacts on your Windows 11 computer.
- Phone Calls, Call History, and Messaging – disable them if you lot don't make phone calls or send texts from your PC.
- Once every unnecessary service and permission has been disabled, reboot your PC and see if the operation of your Windows 11 computer has improved.
If you're all the same experiencing slowness and full general sluggishness when using your Windows eleven computer, move down to the next method below.
Adjust Operation Options for Best Performance
If the modifications enforced above have only improved the operation of your Windows 11 calculator marginally, 1 more matter that you can suit is the Performance Options.
As you know, Windows 11 has a lot of new animations that give it that modern aesthetic. But while all of these effects are very pleasing to the eye, they tin besides accept a large impact on your system performance – especially if you're using PC with a low-end dedicated GPU.
In this case, a trip to the Performance Options (inside System Properties) will allow y'all to improve the operation of your Windows 11 computer by disabling every unnecessary animation and optimize the UI for the best performance.
Note: Keep in heed that by default, Windows eleven is configured to suit these settings for the best appearance.
Follow the steps below for the complete instructions on adjusting the Functioning Options on Windows 11 for the Best Operation:
- Press Windows key + R to open up upwards a Run dialog box. Adjacent, blazon 'sysdm.cpl' inside the text box and press Enter to open up up the System Properties screen.

Open up the Arrangement Properties screen - Once y'all're inside the System Properties screen, click on Advanced from the carte du jour at the peak, so click on the Settings button associated with Performance.

Accessing the Settings screen of Performance - One time yous're inside the Performance Options screen, become to Visual Furnishings using the ribbon bar at the top, then select the Conform for best performancetoggle.

Adjusting Windows 11 for the best performance - Click Apply to save the changes, then restart your PC and see if the operation of your Windows eleven computer improves.
In instance yous're however experiencing general system languor even after making this modification, move down to the next method beneath to learn how to disable startup services that might affect the performance of your Windows eleven computer.
Disable unnecessary startup services
If y'all're only experiencing full general sluggishness associated with Windows 11 a few minutes afterwards your computer boots upwardly earlier the OS finally starts to perform unremarkably, chances are the startup services you presently accept configured are hogging a lot of system resource.
In instance y'all observe yourself in this particular scenario, y'all should be able to fix this effect past taking a await at your fleet of Startup items and disable every entry that you don't actually use.
If y'all have a lot of unnecessary startup services that take a medium or loftier impact, this change will dramatically improve the time it takes until your Windows 11 OS start behaving usually one time you boot information technology up.
Follow the instructions below for some stride-by-step instructions on disabling every unnecessary startup service on Windows xi:
- Press Ctrl + Shift + Esc to open upwardly Task Manager on Windows 11.
- If you see the uncomplicated interface of Chore Manager opening, click on Fashion details (bottom of the screen) to bring up the expert interface.

Accessing the Mode details screen Notation: If the practiced interface opens by default, skip this pace altogether.
- One time you're within the expert interface of Chore Manager, click on Startup from the horizontal menu at the superlative.
- Next, click on the Startup impact column to order all your startup services based on the affect they take on your system.

Gild services via Startup Bear on on Windows 11 - One time every startup service is ordered based on the impact they have on your system, right-click on every service that you don't really need to start along with every startup and click Disable from the context menu.

Disable every unnecessary startup service on Windows 11 - Once every unnecessary service has been disabled, reboot your PC and meet if the slowness issues with Windows 11 accept been fixed.
In case your Windows 11 installation is nonetheless dull and unresponsive, move downward to the adjacent potential fix below.
Optimize your OS drive
If near of the slowness associated with Windows eleven happens when you lot're using File Explorer or when you're attempting to copy, move or replace files on your OS drive, chances are y'all're dealing with a heavily fragmented drive.
In this case, the best grade of action is to use the Optimize Drives characteristic on WIndows eleven to defragment the drive where Windows eleven is installed to make sure y'all get the best possible performance out of your HDD or SSD bulldoze.
Several affected users that also utilized this fix have reported that the languor happening when using File Explorer has all merely disappeared.
Important: This method won't practice much for you if you but clean installed Windows 11 subsequently formatting the drive. However, it's known to be very effective in situations where the PC was upgraded to Windows 11 from an older Windows version.
Follow the instructions below for a pace-by-step guide on optimizing the drive that is currently storing Windows 11:
- Press Windows cardinal + R to open up up a Run dialog box. Adjacent, type 'dfrgui.exe'and press Enter to open up the Optimize Drives window.

Accessing the Optimize Drives utility - In case you're prompted by the User Account Control window, click Yes to grant administrative privileges.
- Once you're inside the Optimize Drives window, select tour Windows Drive from the list under Status.

Selecting the Bone drive Notation: You lot tin recognize the Windows Drive by checking which entry has the little Windows icon.
- Next, in one case y'all've fabricated sure that the correct bulldoze is selected, click on the Optimize button and click Yeah to grant admin admission.

Optimizing the drive - Await until the operation is complete and don't restart your PC until the operation is complete.
- Later the drive is optimized, reboot and see if your system performance improves.
Cleanup System Files
If you oasis't washed this notwithstanding, you lot should also attempt to utilize the Disk Cleanup utility to make sure you have no unnecessary DirectX Shader Cache, Delivery Optimization Files,Temporary Net filesorDownloaded Program Files that might brand your Windows 11 computer perform slower than usual.
If the problem just started to occur recently, follow the instructions below to run a Disk Cleanup scan to remove every unnecessary organisation file:
Note: Make certain you're not running any resources-enervating chore earlier post-obit the instructions below.
- Press Windows primal + R to open up a Run dialog box. Next, type 'cleanmgr' inside the text box and press Enter to open up up the Disk Cleanup utility.

Opening upwardly the Disk Cleanup Utility - When y'all're prompted past the User Account Control prompt, click Aye to grant administrative admission.
- At the commencement Deejay Cleanup utility, make certain you select the Os (Windows) drive using theDrivesdrop-downward carte du jour.

Performing a Disk Cleanup on the OS drive Notation: You can distinguish between a regular drive and the Os drive by looking if for the Windows icon.
- Once you're inside the Disk Cleanup tab, ensure that yous select the post-obit items from the box undeFiles to Delete:
- Downloaded Program Files
- Temporary Internet Files
- Straight Sharder cache
- Commitment Optimization Files
- Once every type of file mentioned above has been selected, get alee and click on Clean up system files.

Cleaning up temp files via Cleanup Manager - When you're prompted by the User Business relationship Control prompt, hitting Yeah to grant admin access.
- Await until the performance is complete, so reboot your PC and see if the performance of your Windows 11 computer improves.
If y'all're still facing the same kind of issues, move down to the next potential fix below.
Delete Temp and Prefetch items
Another potential culprit that might be causing general organization slowness on Windows 11 is corrupted information present in the Temp or Prefetch folder.
Both of these directories are vulnerable to hosting corrupted system files on Windows 11, especially if y'all're using insider build versions.
Several users that we're also noticing that Windows 11 was performing increasingly slowly have confirmed that the Windows eleven became 'snappy' again later on they cleared both of these directories.
Note: While Temp is a directory used past Windows to store temporary organization files related to your applications and arrangement processes, Prefetch is defended to storing temporary launch data that is used to improve boot times and programme launch times. Both of these directories can be cleared without affecting other OS components.
Follow the instructions below for steps on clearing both the Temp and Prefetch folders on Windows 11:
- Printing Windows cardinal + R to open up a Run dialog box. Next, type 'temp' within the text box and press Enter to open up the Temp folder.

Opening up the Temp folder - When you're prompted past the User Account Control window, click Continue to grant admin access.
- Once you're inside the temp folder, click within the folder, and then press Ctrl + A to select everything within, then correct-click on a selected item and click on Delete from the context menu that but appeared.

Deleting the Temp binder on Windows 11 - Once every entry present in the Temp folder is cleared, close the File Explorer window.
- Open upwardly some other Run prompt past pressing Windows key + R. Inside the text box, type 'prefetch and press Enter to open up the Prefetch folder.

Opening upwards the Prefetch folder - At the User Account Control prompt, click Continue to grant admin admission.

Granting admin access - In one case you're inside the Prefetch folder, click on an item inside the folder and then press Ctrl + A to select within the directory.
- Next, once every detail is selected, right-click on any selected item and click on Delete to confirm the deletion of every temp file present in the Prefetch folder.

Deleting the Prefetch folder - Wait until every temporary file is deleted, and so restart your PC and see if the performance of your Windows 11 installation has improved.
If the trouble is still not stock-still, move down to the terminal set up beneath.
Adjust the MouseHoverTime (if applicable)
If you feel similar the on-screen cursor is lagging behind your actual move of the mouse, your Windows xi installation is most probable suffering from the 'MouseHoverTime problems' that's affecting a lot of upgrade PCs that make the transition to Windows 11 from an older Windows installation.
This is most likely the case if merely your mouse seems tedious but the overall system functioning seems normal.
What happens is a Registry value gets incorrectly migrated to WIndows eleven and displays a value that is the wall over the normal parameters. Fortunately, you can fix this consequence and resolve the 'laziness' of your mouse by using the Registry Editor to modify the MouseHoverTime string to an acceptable value.
Follow the instructions below to enforce this fix:
- Press Windows key + R to open up up a Run dialog box. Adjacent, type 'regedit' within the text box and printing Ctrl + Shift + Enter to open up upwards the Registry Editor tool with admin access.

Opening upwards the Registry Editor - At the User Account Command prompt, click Aye to grant admin access.
- In one case you lot're inside the Registry Editor, use the carte du jour on the left to navigate to the following location:
Computer\HKEY_CURRENT_USER\Control Panel\Mouse
Note: You can either navigate to this location manually or you tin can paste the full path within the nav bar at the elevation and press Enter to get at that place instantly.
- After yous're inside the correct location, motion to the right-mitt side menu and double-click on the MouseHoverTimestring file.
- If the value data is 400, change information technology to x and click Ok to save the changes.

Adjusting the value of MouseHoverTime - Reboot your PC and see if there is an improvement in how your mouse behaves on Windows 11.
If this method was non applicative in your scenario, move down to the adjacent method below.
Running SFC, DISM, and CHKDSK scans
In example none of the methods in a higher place accept proven to exist expective in your instance and your hardware should be more than than capable of running Windows 11 smoothly, you should first considering a potential issue caused past corrupted system file components or a faulty drive.
First things first, yous should practise a CHKDSK scan & repair and run across if your current storage device has some block issues. In case the bulldoze begins to neglect, the Check Disk utility is capable of replacing information sectors going back with unused sectors (if bachelor).

Once the Check Deejay browse & repair scan is complete, reboot your PC and expect for the next startup is complete earlier initiating an SFC browse.

Note: SFC volition replace local file corruption using salubrious equivalents from a local storage cache. An cyberspace connectedness is not required.
Once the SFC scan is complete, reboot your computer in one case again and await for the next startup to complete.
Finally, go alee and deploy a DISM scan.

Note: Make sure you accept a stable internet connection before deploying a DISM scan. This tool uses the WU component to download salubrious system files that volition be used to supersede corrupted equivalents.
bouchardinvisce69.blogspot.com
Source: https://appuals.com/slow-or-sluggish-windows-11/
0 Response to "My Computer Gets Downgraded Once Again Donut"
Post a Comment